Showing posts with label My Violin. Show all posts

Wednesday, October 31, 2007

The Violin Project


Here's an update on the "in progress" violin.

In the first picture, the front is on the left and the back is on the right.


The second and third pictures are of the back, as it is this afternoon. I've spent a bunch of time with thumb planes and scrapers and to my inexperienced eye, it looks like it's ready for me to put the purfling in (the black like around the edges of violins, and guitars and other wooden instruments). I have to cut the groove and then set the purfling (tiny strips of wood fibre) into the groove and glue it in. After that is done, I will start carving out the inside. I've ordered the stuff I need for the purfling, but in the meantime, I'll get busy finishing off the front.

It's hard to get a picture that is is the same as looking it in real life, but it's so smooth now except around the edges which get finished after the purfling.

I can't wait to hear it .... and start on another!

Friday, September 14, 2007

What's Granny been up to?

I've been accused of not blogging enough, so I thought I'd do a quick post before work this morning.

As you know, Gryper & the Missus just got back from the Northwest Territories and the Yukon. The gave me a bag of ground musk ox to try. So last night we had company for dinner, and in my spirit of treating company like guinea pigs, I tested another new recipe on them. I made a tourtiere (Quebecois meat pie) and used the musk ox. Grandpa said "I knew it would be good, but I didn't know it would be that good". It was a success, thanks Grypers!

While our company was here, I had to show of my violin-in-progress ... I was astounded when I put the three parts together .. for some unknown reason, I hadn't done it before. It blew my mind. This thing is actually starting to look like a violin!!


I've had a knitting pattern in my head for a while and decided to make some "knucks". You know, fingerless gloves. I wanted to do them on one long circular needle. So I made the fingers and thimbs, and put them on double pointed needles, then started assembling them. Here's my progress on that project.


Next month, I'm once again going on the canopy tour "Walk in The Clouds" at the Haliburton Forest, but this time my partner will be Grandson the second. You'll recall we took Grandson the first for his 13th birthday a couple of years ago. I'm so excited about doing it with him. Speaking of the grandkids, since Lexiphage is going to a wedding the end of the month, I'll own Grandson the third and Granddaughter the first for a whole weekend. That'll be really cool, we're going on a trip to the zoo one of the days. Yahoo!

Here is a picture of a sunrise that I took out in front of the house a few days ago. Early autumn in Haliburton ... I'm really pleased with how this pic turned out. There's nothing like watching the sunrise from the dock - maybe I'll go and stand down there now, although I've missed the sunrise this morning, the water is sparkling..


Wednesday, August 15, 2007

Update On My Violin

Cheryl asked why I haven't blogged lately. I can't type, my fingers are sore! Okay, not really, I've just been busy.

I wasn't happy with the templates I originally made for my violin, so I made a new set yesterday. They should make it much easier for finishing these babies.

Here's what I've done since my course, in between all my other stuff. Slow and steady wins the race, right?

Monday, August 06, 2007

Violinmaking

Here's an update on my violin making class from last week. Scroll down to the post before this one to see how it looked when I went in to the course on Monday, then come back and look at these pictures.

You can see the back is much thinner and closer to the finished size (on the edges). When I went in on Monday it was about 8mm thick around the sides and now it's down to about 4.5mm on the edges and I'm working my way down just inside the edges. In the picture of the back you see the little thumb planes that I'm using. You can also see there's still a lot of wood to come off.

The second picture shows that I joined the spruce top together and got started on the rough arching for it.

It really makes a difference when you know how to use the tools. Not only did I not really know how to use the gouges effectively, but I was not being nearly aggressive enough removing wood. I learned how to sharpen gouges, planes, and chisels. I learned how to use planes, and the pencil calipers.

Last year when I finished the week, I came home not really knowing how to proceed, so I read about it in books. This year, I know what I have to do and I know how to do it. The only thing that'll slow down the process is my technique. It's one thing to have watched it being done, and another altogether actually doing it. What is it they say about surgery ... "See one, do one, teach one". So in the spirit of my personal motto, "How hard can it be", I expect to get a lot done this year.


Stay tuned!

Monday, April 16, 2007

Another Fiddle Update

Okay ... it doesn't look like much has been done since last time I blogged, but there's hours of work gone into it since March 31st (my last update).


The thing I like about this picture is that some of the shimmery grain of the wood is starting to show. Not only is it the shape of the back of a fiddle, but I'm starting to see what the details of back will be like.


Just thinking about it my heart does that little flip thing. So exciting.


Sunday, December 31, 2006

Cut away everything that doesn't look like a violin

A continuation of my September 25th post.


Time off between Christmas and New Year's has been fun. Although there has been plenty to do, my shoulder has healed enough that I can actually do work on my fiddle again. Rotator cuff injuries make doing all kinds of things nearly impossible.


You may recall when I finished the sides and proudly displayed them. Each step of the way, I've been really anxious, and by the time I put tool to wood, I've done it a hundred times in my head. Here again is the sides completed and sitting on the maple that will be her back.


Then I gathered up all my nerve and cut into that beautiful piece of bird's eye maple. I started taking little nibbles of wood and then eventually, got relaxed and finished her outline.


I have spent some time over the holidays with a chisel and a beech mallet, again taking little nibbles. And guess what I found?!?! There really is a violin inside that piece of wood. I can't tell you how excited I am, just watching it emerge. I'm already imagining what she will sound like when I play the first notes.


Monday, September 25, 2006

More on the fiddlemaking

Okay ... here's the back of my fiddle with the sides sitting on it. I traced the outsides of the sides onto it, then with great anxiety made my way to the band saw.


I was pretty anxious about cutting into this beautiful one inch thick piece of maple, so I decide that I was just going to cut the corners off and take a few big "bites" off it, then I would quit for the day. As I got going and got the feel of it, I started to calm myself a bit, and then went hog-wild and cut the whole thing out.


Here's the sides sitting on the back. I've left about 5 mm all the way around for filing, sanding and finishing. What you see on this side will be the inside of the violin, but it will have to be carved out. That comes after I carve the outside.


This is the sides and back sitting side by side ... what you see in this one will be the outside of the back. It has really pretty flames (the sort of stripes) and you can see the really cool bird's eye lines in the grain.


Next I take my big gouge and start cutting away everything that doesn't look like a violin.

Tuesday, September 19, 2006

The sides are done


Okay, so here it is. I've installed the linings and the sides of my fiddle are now complete.

It was really stressful cutting into the corner block to fit the ends of the liners in. The cuts into the corner blocks aren't as pretty as the picture in my book of "how to", but I'm really proud of how it has turned out so far.

The next step is to draw the outline on the bird's eye maple back (it's one piece) and cut it ... then start carving.

Monday, September 11, 2006

More on the Wendivarius


So I've been working on my fiddle .... if you check the last posting that I did on it, you could see the corners weren't trimmed. I've spent a a lot of time with the plane, sandpaper and various other things getting the sides finished.

If you look at the corners they're nicely trimmed ... they just need a final go with the drum-sander to ensure they're perfectly square.

What you can't really see from this picture is that it's perfectly smooth and level on the top and bottom of the sides. The upper end is exactly 30 mm and the lower end is exactly 32 mm. Just as planned.

I'm still reeling with shock and awe. So next I fit the linings in, which are willow strips that support the sides and give the top and bottom a little more meat to hang onto.

After that is done the mould comes out of the middle and it will sit and wait patiently while I carve the belly, back and neck. I'm looking forward to doing the scroll!

I'll keep you posted as I go.

Tuesday, August 08, 2006

Musical Instrument Construction Course

Okay, so here are the pictures of my violin. The first day we made templates from the plans and that took the whole day. It didn't seem like much at the end of the day, but it was a lot of work.

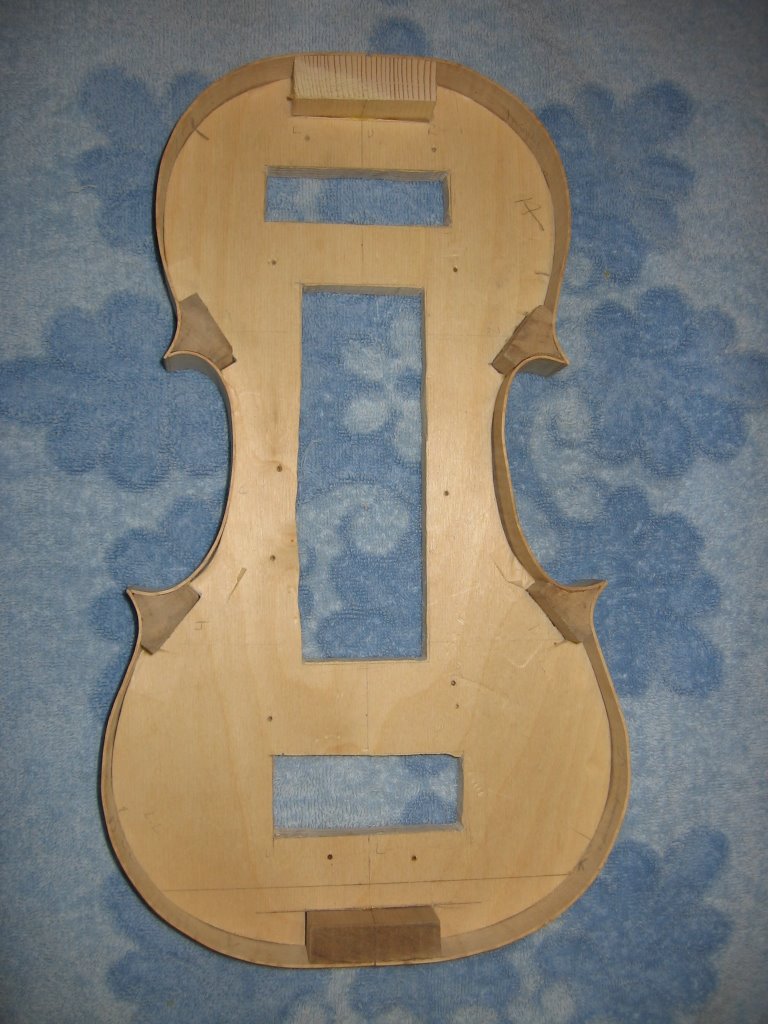
Day two we made the mould for the violin, I forgot to take a picture of it. It took a full day to make the mould and cut out where the corner blocks and end blocks go. Then I had to cut out the rectangles you see on the picture (below) with a coping saw for the clamps to fit into. Coping saws are quite the fun little gadget. It took me a while to get the hang of using it, and I was slow and not nearly as precise as I would have liked to have been.

Here's a picture of my work on day three, after I'd glued the corner blocks and the end blocks in place.


On day four two tornadoes went through the area and our class was cancelled due to a power outage at the school. That was really disappointing; we were all so anxious to get on with our projects.


However, the school is near the hospital, so day five, the electricity was back on in that area, (unlike where we live!) and we were back in action.

Here's my picture at the end of day five. You can see the side ribbing is all glued into place around the mould and it actually looks like it might be a violin some day! There are some mistakes, but I'm not pointing them out. I'm so excited that I was able to do something like that. I'm already looking forward to next year.

Eventually, when it comes off the mould, the corner blocks (pointy dark brown parts) will be inside the violin, but will be trimmed much smaller and the outside pointy bits will be cut down to the proper size. The two end blocks will be inside the violin too and the mould will be ready and waiting for my next violin.

Awesome course. Kudos to Philip Davis the instructor for his patience.